Qontalk is a Go SDK that provides provides a unified Go SDK for seamless interaction with both the Qontak and FSM APIs, allowing you to interact with the Qontak platform. This SDK includes functionalities to authenticate, send message interactions, send interactive messages, send WhatsApp messages, send Direct WhatsApp Broadcasts, and retrieve WhatsApp Templates.
For more detailed information on using the Qontak Go SDK, check out the GODOC.md file.
Overview 💡
The qontalk package combines the functionality of the Qontak and FSM packages to provide a single, comprehensive SDK for both Qontak messaging and Finite State Machine (FSM) operations. This package allows you to effortlessly work with Qontak for messaging while simultaneously building, managing, and executing FSMs within your applications.
Qontak Integration 🌵
The Qontak integration within qontalk enables you to:
Authenticate with Qontak’s services using various authentication methods.
Send messages to customers and agents, including text, images, and interactive messages.
Manage WhatsApp templates and send WhatsApp messages.
Perform Direct WhatsApp Broadcasts with customization options.
You can utilize these features to enhance your messaging capabilities and communication with customers and agents through Qontak’s platform.
Finite State Machine (FSM) Integration 🚀
The FSM integration allows you to create, manage, and execute Finite State Machines within your application. You can define custom states, events, transitions, and callbacks to control the flow of your application based on specific conditions.
Key features of the FSM integration include:
Creating FSM instances with custom initial states and transitions.
Sending events to trigger state transitions.
Managing FSM lifecycle, including starting and stopping FSM execution.
Defining global callbacks to handle state transitions and events.
This FSM integration empowers you to build complex, stateful applications with ease.
Installation
To install the Qontalk SDK, you can use go get:
go get github.com/maskentir/qontalk
Documentation
You can find the full documentation for the Qontalk SDK here.
Usage
Here is a simple example of how to use the Qontalk SDK:
package main
import (
"fmt""regexp""github.com/maskentir/qontalk""github.com/maskentir/qontalk/fsm"
)
funcmain() {
// Create a QontalkSDK instancesdk:=qontalk.NewQontalkSDKBuilder().
WithClientCredentials("your-username", "your-password", "your-grant-type", "your-client-id", "your-client-secret").
Build()
// Authenticate with Qontakiferr:=sdk.Authenticate(); err!=nil {
fmt.Println("Authentication failed:", err)
return
}
// Use Qontak features, send messages, etc.// Create a new chatbot instancebot:=fsm.NewBot("MyChatbot")
// Define states and transitionstransitions:= []fsm.Transition{
{Event: "start", Target: "initial"},
{Event: "continue", Target: "ongoing"},
}
bot.AddState("initial", "Welcome to the chatbot!", transitions)
// Define rules and actionsrulePattern:="hello"regexPattern:=fmt.Sprintf("(?i)%s", regexp.QuoteMeta(rulePattern))
rule:= fsm.Rule{
Name: "HelloRule",
Pattern: regexp.MustCompile(regexPattern),
Respond: "Hello! How can I assist you?",
}
bot.AddRuleToState("initial", rule.Name, regexPattern, rule.Respond, nil, nil)
// Process user messagesresponse, err:=bot.ProcessMessage("user123", "hello")
iferr!=nil {
fmt.Println("Error:", err)
return
}
fmt.Println("Bot Response:", response)
}
To use a different version of vJoy (e.g., v2.1.9 or v2.2.1), you need to also download the SDK.zip file. Copy and replace the corresponding vJoyInterface.dll and vJoyInterfaceWrap.dll from the sdk folder (SDK\c#\x86 in the zip file) to the extracted folder (where MIDIvJoy.exe is located).
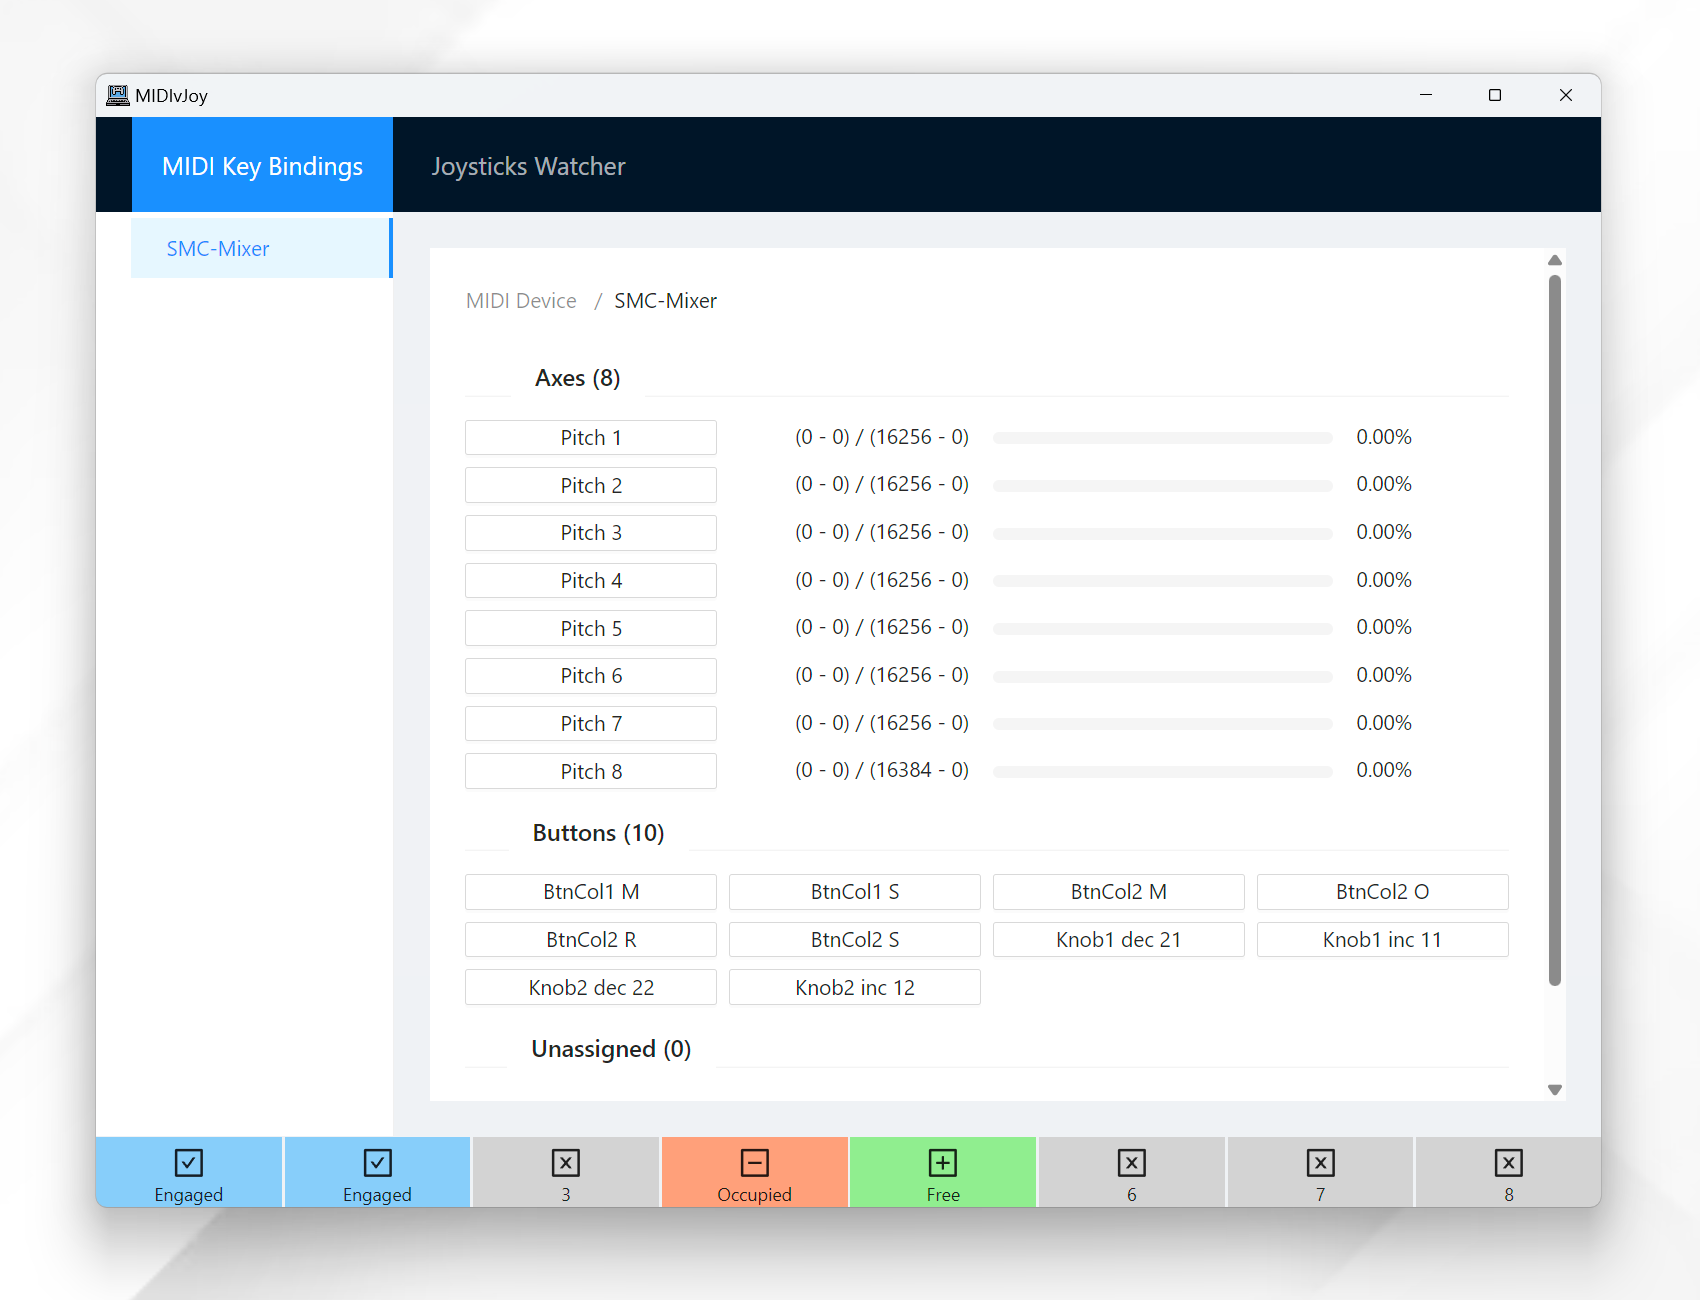
Usage
This program listens for MIDI controller inputs and maps them to vJoy joystick inputs. It will automatically detect any connected MIDI controllers and enabled vJoy devices.
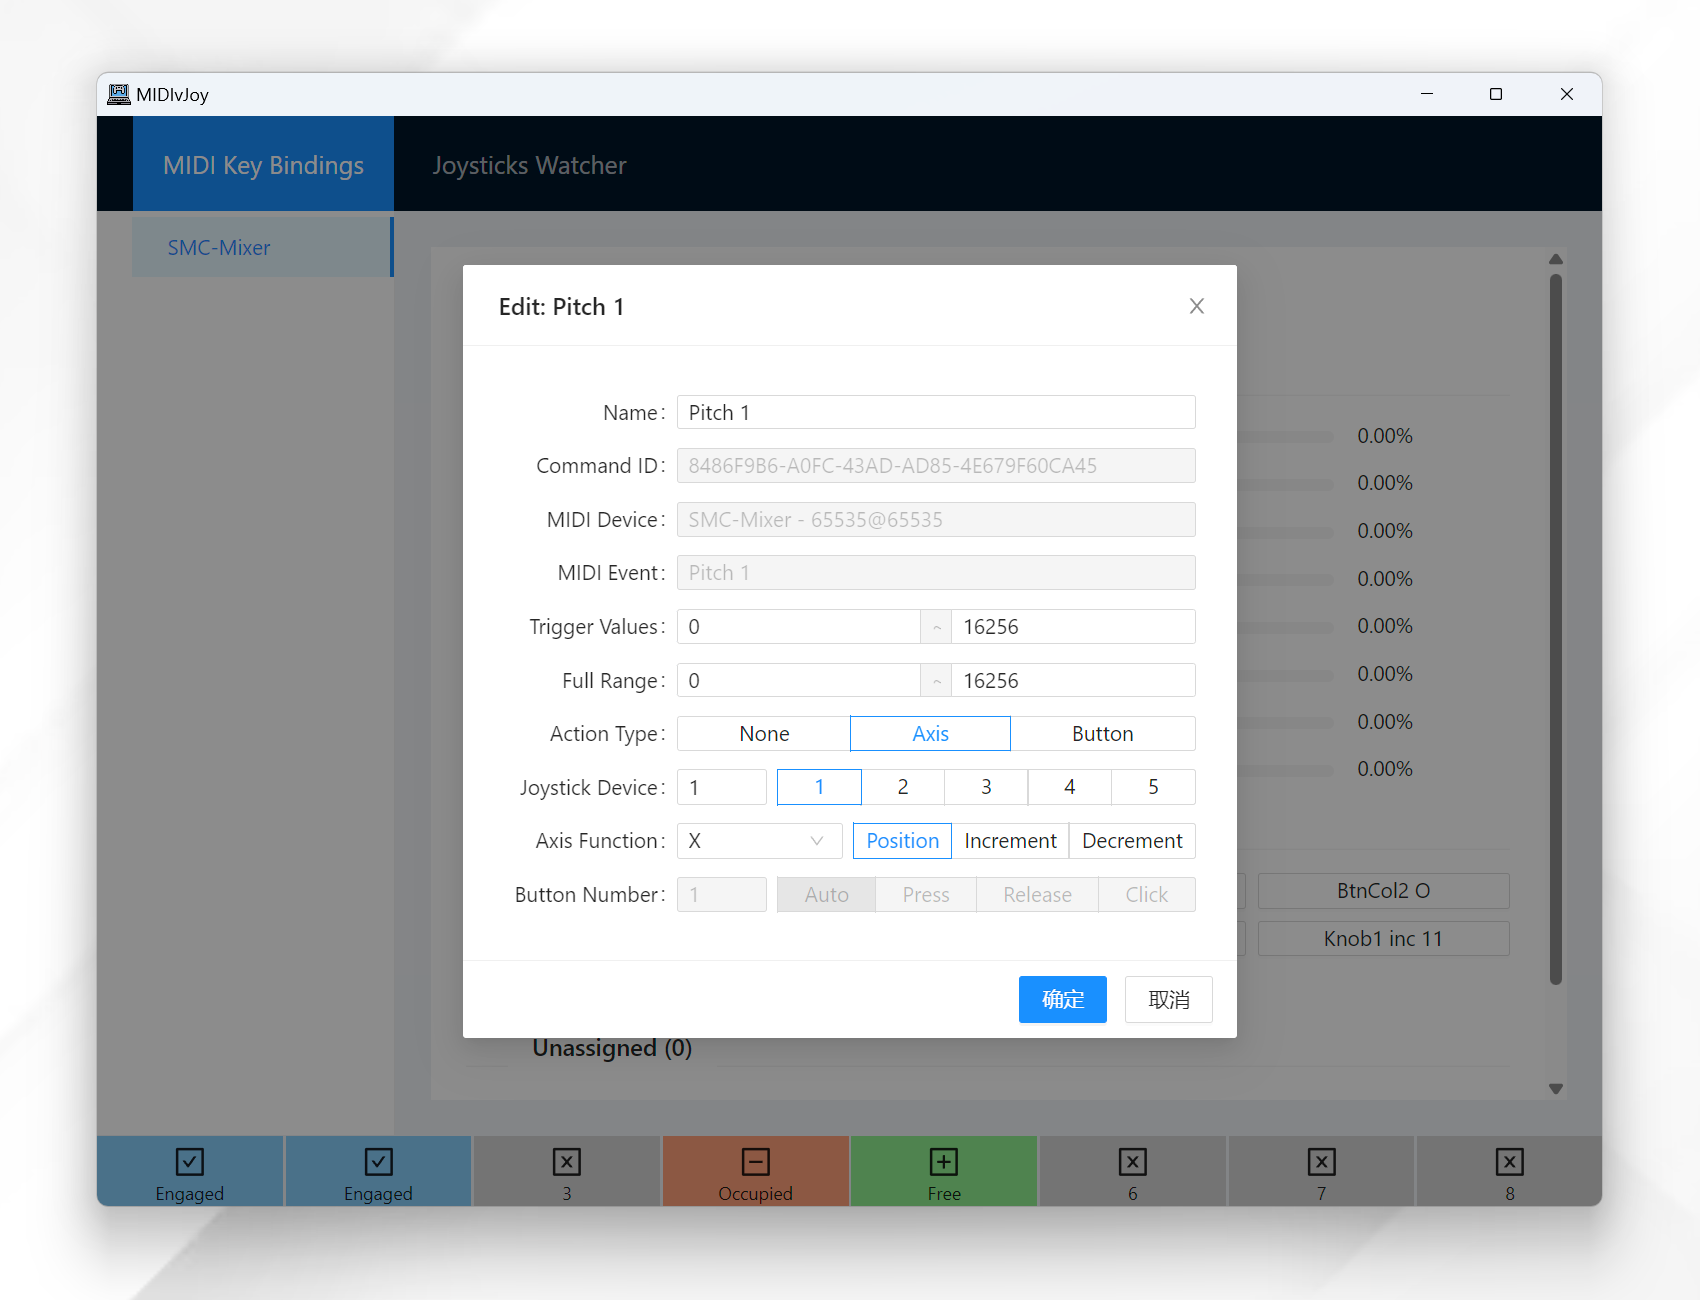
Just move the fader/knob/button on your MIDI controller and the program will catch and list them in the Unassigned list. You can then map the detected MIDI event to a vJoy action by clicking on it and editing the properties in the popup window.
There are two basic types of joystick actions: Axis and Button.
For the axis, you can change the range of the MIDI event by setting the minimum and maximum values. The action will be activated when the MIDI event value is within the trigger range, while the position of the joystick axis will be calculated based on the full range.
That is,
It is possible to assign multiple joystick actions to a single MIDI event with different trigger ranges (but do not overlap).
You can tweak these ranges to get the desired sensitivity and dead zone.
For buttons, you can set the button number and whether the button is pressed or released. If you use the Auto option, the program will automatically set the value – released if the value is equal or smaller than the minimum value in full range, pressed if greater. That is,
However, for knobs, you need to set two actions separately for clockwise and counterclockwise. This kind of action can only be simulated as continuous button presses now (50 ms on and then 50 ms off). It is possible but does not work well in MSFS to implement knob actions as axis increments/decrements. PRs are welcome if you have a better idea!
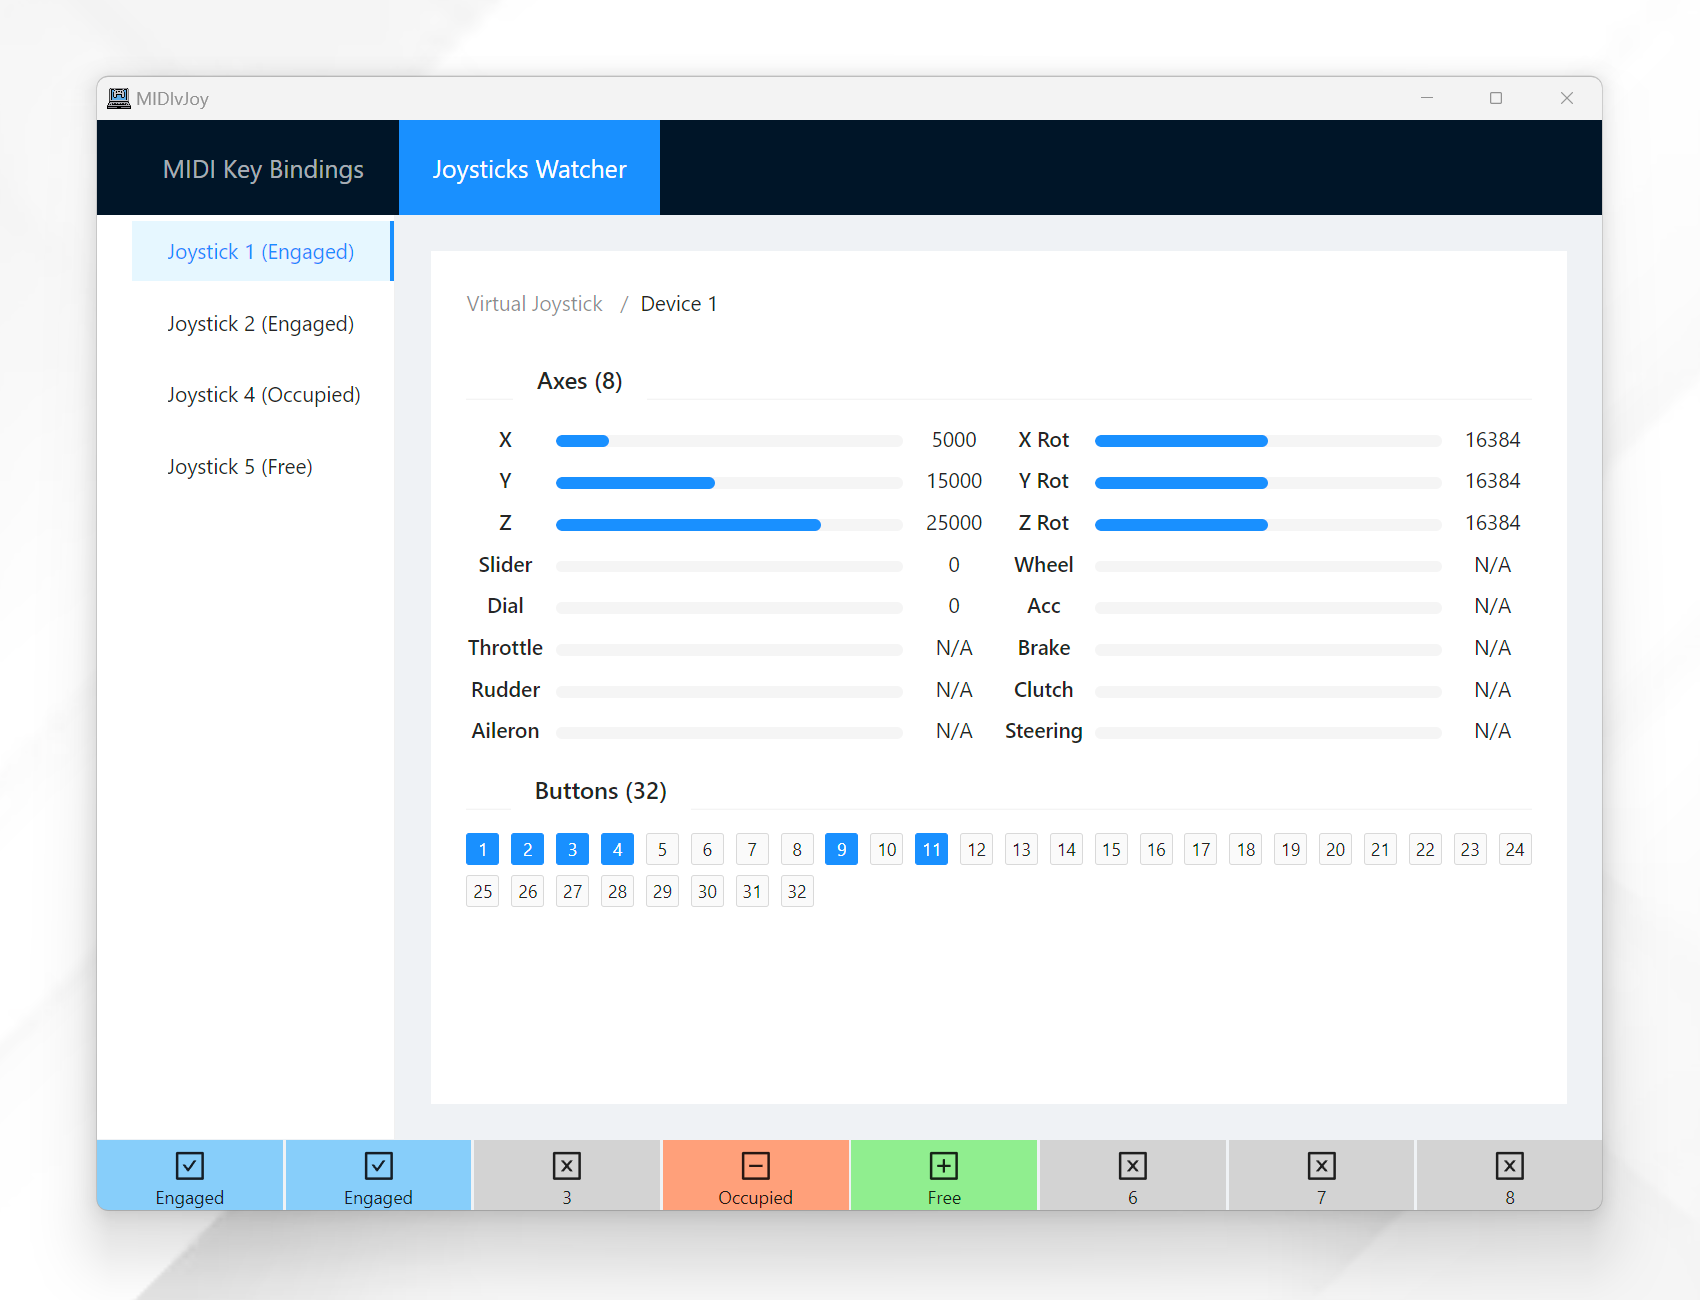
After you have mapped all the MIDI events to vJoy actions, you should engage the vJoy by clicking the respective joystick button at the bottom of the window. The program will start sending the corresponding joystick actions to the vJoy device. You can disable the joystick by clicking the button again.
Your configuration will be saved and loaded automatically, but you need to engage the joystick manually every time you start the program.
There is a simple vJoy monitor that shows the current state of the vJoy devices. You can use this monitor to check if the joystick inputs are working as expected.
Installation is done manually until further notice.
Instructions
Clone this repo: $ git clone https://github.com/Lawrence-Chiappelli/i3-config-files.git
Then:
Manually move config to ~/.config/i3/
Manually move *.sh script files to ~/.config/i3blocks/
Make directories if necessary.
Or:
Copy .config folder to home/$USER. Just make sure to back up your existing configuration files if you do this.
Note: You will have to edit ~/.config/i3/config if you want to change the directory of my *.sh scripts. I would also recommend editing that file and change the $TERMINAL variable to your terminal, if it’s anything other than Alacritty.
I have left comments in these files that document my motivations for certain decisions. Assume my intent was experimentation. I was new to the bash language and was aiming to get a handle on things.
Mainly controls master and headphone volume. Relies on alsamixer.
/brightness.sh
Increases/decreases the brightness of all of your monitors by clicking the yellow up/down arrow icons. Relies on xrandr.
Brightness values are strictly limited between 100% and 10%, meaning you cannot go over or under those thresholds.
/cpu.sh
Displays CPU load as a whole percentage. Typically, others choose to display 1 or 2 additional decimal places. I prefer compactness of omitting decimal places, but it’s easy enough to adjust this if you prefer different decimal formats.
/gpu.sh
Only displays GPU load as a whole percentage. This script contains unused GPU parameters (such as fan speed, temperature, etc) to provide the means of easily expanding on informational output. It does, however, assuming you’re running an Nvidia GPU by using nvidia-smi. This will likely return 0% if you are using an integrated GPU or missing drivers.
/ram.sh
Displays used RAM in G / available RAM in G. The text color becomes progressively “green-er” the more RAM you use (i.e., “unused RAM is wasted RAM”). I find this useful to benchmark my system’s capacity as I continue to open programs and increase system load, therefore providing the confidence to safely utilize the system’s full potential.
/ssid.sh
A script originally planned to display the name of the SSID I am connected to. However, my alternative idea is simple: if you can ping aur.archlinux.org, you are connected to the internet. Successful connection to the internet is colored in green. Unsuccessful connection is colored red.
One caveat is that this script assumes you’ll be connected via USB tethering. The for reason for this is that my wifi adapter lacked driver support at the time.
If you have USB tethering enabled, but have no internet access, it will simply indicate so with the text “USB tethering”. This means it recongizes you have USB tethering enabled, but you’ll have to take some further action to connect to the internet. Hint: check your device’s MAC address with $ ip addr.
Icons
The following details the clickable, interactive icons not tied to any scripts:
Yellow up/down arrows
Click to increase/decreases brightness, respectively.
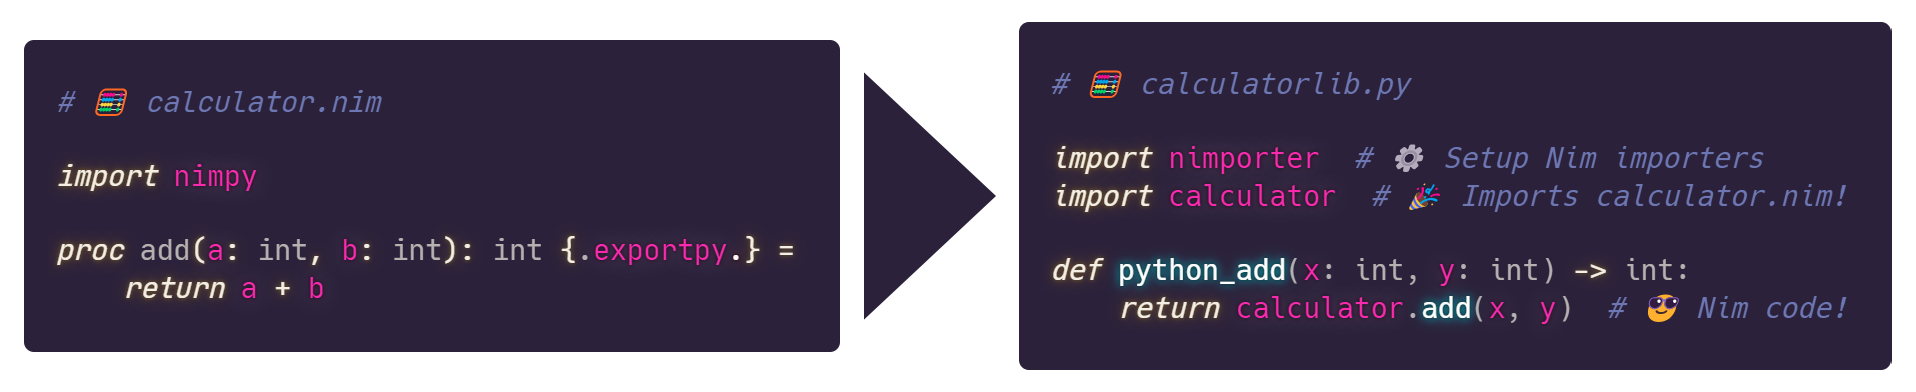
Nimpy library (installed automatically
if nimporter init lib is used)
Nimporter library (distributed
libraries will need access to Nimporter).
Nimporter can work seamlessly when Nim is installed via
Choosenim
or manually. No additional configuration is necessary once installed since
Nimporter can find the Nim standard library and install
Nimpy library if Nimble is on your path.
End User Dependencies:
Users of Nimporter libraries only need Nimporter! 🎉
📚 Documentation
To get started, first look at the Nimpy
project as that is how Nim libraries are created that can be imported into
Python. During development, Python can directly import the Nim file and build
the public user-facing Python API in tandem with the Nim library extension. For
assistance with the Nim language, look at
Nim For Python Programmers
as it is a great resource for getting up to speed quickly with Nim. Finally,
Nimporter’s unit tests all make use of a
reference project
that was designed to use each of Nimporter’s features.
Yielding values back to Python using iterators in Nim.
Exposing Nim functions with custom names.
Exposing Nim extension modules with customized names and docstrings.
Using Python builtin functions in Nim.
Using passed Python objects and accessing methods and fields.
Passing keyword arguments to a Python function.
📋 Features
Directly import Nim Extension Modules & Extension Libraries using Nimpy
Cache build artifacts for quicker subsequent runs
Invalidate cache using hash files
Stores artifacts and hash files in __pycache__ to not clutter project
Build Source & Binary Distributions using Nimporer with 1 line of code
Command Line Interface for introspecting, initializing, and compiling
projects
Nimporter does not require that library end-users install a Nim compiler
🛠️ Usage
Nimporter is a library that allows the seamless import & packaging of Nim
extensions for Python built with Nimpy.
Nimpy is a library that is used on the Nim side for iteroperability with
Python. All Nimporter libraries rely on Nimpy in order to expose Nim functions
to Python. Nimporter’s role in this is to formalize a method of distributing
Nimpy libraries to ease the burden on library maintainers and end users so that
they do not have to even have knowledge of Nim in order to use the library.
Nimpy is a complete library by itself. For information on how to integrate Nim
and Python, look at the
Nimpy documentation as it will be the Nim
day-to-day development experience. Nimporter’s role comes into play when a
library is ready to be distributed. Nimporter handles the entire packaging
for source and binary distributions in 1 line of code.
Important Considerations
Nimporter was designed to help bridge the ecosystem gap between Python and Nim
while utilizing Nimpy so that library authors could seamlessly develop and
distribute their libraries. Due to this fact, there are important limitations
to consider when using Nimporter. They are described below:
Importing: Nimporter uses the C compiler that was used to build Python when
importing a Nim module/library. This can be overridden in a
<lib name>.nim.cfg but doing so means that the library will most likely
not work on other platforms.
Distributing Sources: Nimporter sets the C compiler automatically by
iterating through MSVC and GCC for each platform and architecture combo.
This means that there will likely be several copies of the generated C
source code for each supported platform (given in get_nim_extensions()).
Distributing Binaries: Nimporter uses the same process described for direct
import of Nim code and will use the same C compiler that was used to build
Python itself.
🎻 Instrumentation
To enable Nimporter debug traces, define NIMPORTER_INSTRUMENT in the
environment and Nimporter will use
IceCream to show output from Nim and other
interesting bits necessary for debugging any issues that could arise.
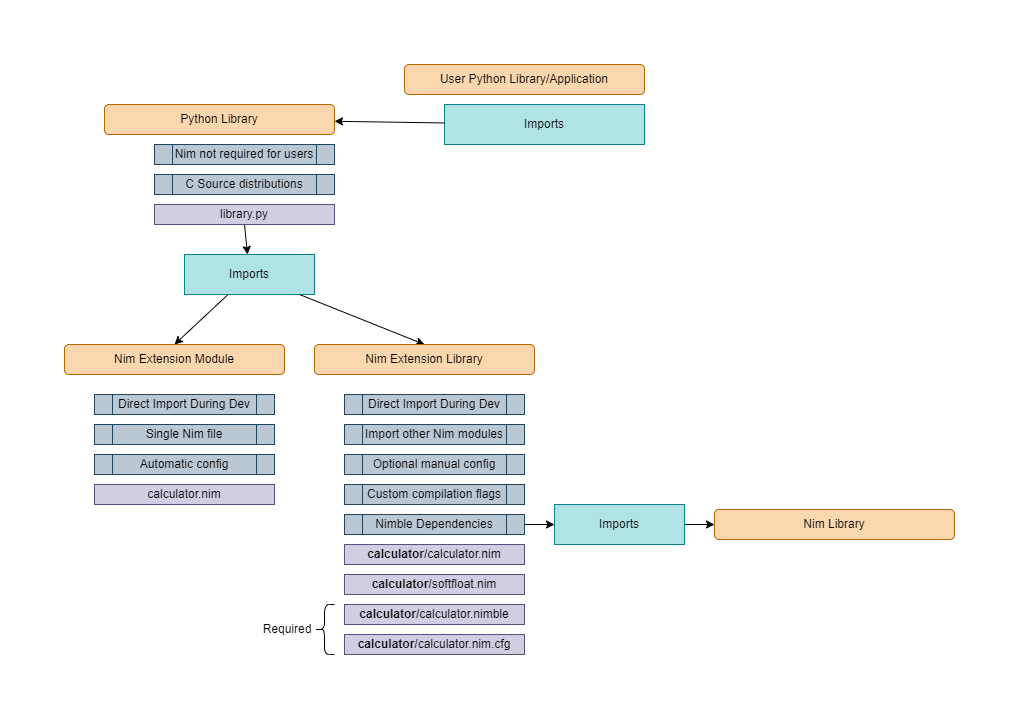
🦓 Extension Modules & Extension Libraries
Extension Modules are distinct from Extension Libraries. Nimporter (not Nimpy)
makes a distinction here. However, it is of special note that distribution of
either extension type is the same (nimporter.get_nim_extensions()).
🦄 Extension Libraries
Extension Libraries are entire Nim projects exposed as a single module from the
perspective of Python. They are comprised of a single folder containing all
code and configuration for the extension. It is important to note that they
are a concept formalized by the Nimporter project and must accept some
limitations.
These limitations (and capabilities) are listed below:
✔️ Can have external Nim dependencies: inside the Extension Library folder,
use a <library name>.nimble in order to depend upon other Nim libraries.
✔️ Can be split up into any number of Nim modules: the Extension Library
folder can contain any desired inner folder structure.
✔️ CLI switches used by Nim & the C compiler can be customized: this can be
useful but be cognizant about cross-platform compatibility. Remember, if
the C compiler used by Python is different than the one used by Nim, there
will definitely without a doubt be strange issues arising from this. Note
that choosing a different C compiler may result in the setup.py not being
able to compile the extension. Use a <library name>.nim.cfg for this use
case.
❌ Must use folder structure known to Nimporter: the below folder structure
is generated when nimporter init lib is used:
the_library_name/
    the_library_name.nim  # Must be present
    the_library_name.nim.cfg  # Must be present even if empty
    the_library_name.nimble  # Must contain `requires "nimpy"`
🐴 Extension Modules
Extension Modules are the simplest form of using Nimpy libraries with existing
Python code. Once Nimporter is imported, Nimpy libraries can be directly
imported like normal Python modules. However, there are a few restrictions on
what is supported when importing a Nim module in this way. It is important to
remember that Nim compiles to C and therefore could theoretically integrate
with a build system that is extremely brittle. To completely solve this,
Nimporter disallows certain use cases that are technically possible but would
otherwise prevent widespread use of the resulting technology.
Below are the restrictions present when importing a Nim Extension Module:
❌ Cannot have any dependencies other than Nimpy: this is due to the fact
that Nimporter disallows multiple *.nimble files strewn about in a Python
project. Use an Extension Library for this use case.
❌ Cannot import other Nim modules in same directory: this is because there
is no way to tell which files pertain to each extension and knowing this is
a prerequisite to packaging the extension up for distribution.
Additionally, Nimporter moves extensions to temporary directories during
compilation in order to control where the Nim compiler places the resultant
C sources.
❌ Cannot customize Nim or C compiler switches: proliferating a Python
package with these extra files would be unsightly and it is possible to
have two different Nim modules with custom configurations collide in
awkward ways. If CLI configuration is required, use an Extension Library.
❌ Cannot override the C compiler used to build the extension: Although this
practice is certainly and technically possible, it is unequivocally a bad
decision when integrating software originating from a different compilers.
If an expert user is in need of this capability, use an Extension Library.
Although these restrictions limit the number of possible use cases for the
integration of Nim & Python, portability, compatibility, and stability were
chosen as the guiding principles for Nimporter.
📦 Distribution
There are a few ways to use Nimporter to integrate Nim & Python code:
🥇 Library uses Nim code internally but exposes a Python API: this is the
reason why Nimporter was built. It was built to allow Python library
authors to use Nim to speed up their library.
🥈 Application uses Nim code: this is very possible but it is recommended to
pull out the Nim code into a Python library that imports that Nim code in
order to take advantage of the amazing distribution features of Nimporter.
Having a separately-updatable library that the application imports greatly
streamlines development and reduces packaging difficulty (the Python
library dependency that imports Nim code behaves exactly like a pure-Python
dependency).
🥉 Docker: this is a possible application of Nimporter, but it requires the
use of nimporter compile in order to let the Docker container not have to
contain a Nim & C compiler and to ensure that the builds are cached.
Amazingly, Nimporter allows the end user installing a library built with
Nimporter to not have to install Nim! 🥳 This is incredible and is accomplished
by recompiling the same Nim extension to every desired platform, architecture,
and C compiler that the library is supported on. Specifically, Nimporter tells
the Nim compiler to compile the extension to C once for Windows, MacOS, and
Linux and and then bundles all of the resulting C source files into the source
distribution. At the time of the installation on the end user’s machine, the
appropriate set of C source files is selected that matches the user’s
environment! 🙂
For binary distributions, this process just skips to the one set of C source
files that matches the host’s environment. One binary distribution per
supported platform must then be built.
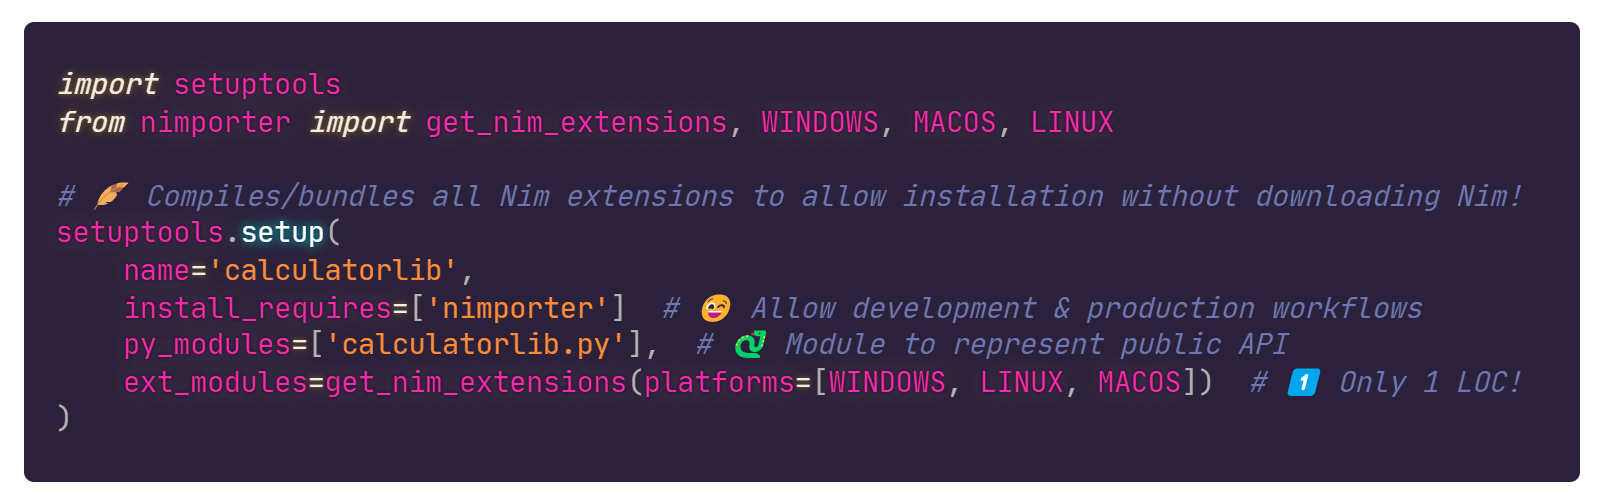
This might sound complicated but Nimporter accomplishes this by requesting that
the setup.py contain 1 line of code to find, compile, and bundle all of the C
files necessary to be portable across platform, architecture, and C compilers.
📧 Source Distributions
To create a source distribution, it is assumed that the setup.py contains a
dependency on Nimporter as well as a call to get_nim_extensions().
The below command will create a source distribution in the dist/ directory
and can be easily uploaded to PyPI.
$ python setup.py sdist # Contains entire matrix of supported platforms, etc.
Note: when an end-user tries to install a Nimporter library from GitHub
directly, it is required that the Nim compiler and a compatible C compiler
is installed because setup.py install is invoked which is equivalent to a
binary distribution but does require the Nim & C compilers to be installed.
💿 Binary Distributions
Binary distributions use the same setup.py structure mentioned above.
The below command will create a Python Wheel in the dist/ directory that can
be easily uploaded to PyPI.
$ python setup.py bdist_wheel # Contains a single supported platform, etc.
Note: A Nim compiler and C compiler is required when creating a binary
distribution.
Special note for Linux users: Unfortunately, PyPi will not allow you to
upload just any Linux wheel. There is a special compilation process that
can be explained here. Interestingly
enough, I got around this by simply renaming the resulting Linux build
according to the manylinux1 naming convention. You can see my solution
in the examples/github_actions_template.yml file for the build-linux
job. I expect that there could be many downsides of using this hack but it
worked for me on 2 different Linux platforms.
⭕ Publish Build Artifacts to PyPi Automatically
For a dead-simple way to publish Windows, MacOS, and Linux packages to PyPi
automatically, use the github_actions_template.yml template found in the
examples/ directory. This template integrates with your repository’s GitHub
Actions runner to build, package, and deploy your library on Windows, MacOS,
and Linux automatically when you create a new “Release” is created.
💽 Computer Hardware Actually Exists
Dynamic, safe programming languages are great, but naturally, when integrating
with native code, there are limitations to what is possible to accomplish in
certain situations. On Windows, a DLL that has been loaded into a process
cannot be deleted while it is in use. Additionally, Windows has a path length
limit of 260 characters by default (and therefore relying on the user having
disabled this limit in the system registry is not possible). This severely
limits how deep a Nim extension can be placed into a Python package hierarchy.
Furthermore, generously-named Nim extensions may fail to compile with a message
that resembles:
failed to open compiler generated file: ''
If this message occurs, it is due to the path length limit of 260 characters.
Shorten the name of the Nim extension and make the package hierarchy
shallower. More information about the 260 character path limit can be found
here.
Nimporter comes with a defense against this behavior by automatically renaming
the generated C sources to not contain the @m and @s symbols that
proliferate the filename and soak up most of the 260 character budget. For
instance, the filename:
Nimporter provides a CLI that you can use to easily clean all cached build and
hash files from your project recursively. This can be very useful for debugging
situations arising from stale builds.
Usage example:
# Removes all __pycache__ directories with .hash, .pyd/.so, and .pyc files
$ nimporter clean
The Nimporter CLI can also precompile all extensions within a project without
needing to run the project. This is useful in situations where you do not want
to package your application using a setup.py (such as a zip file) or for use
within Docker containers.
# Recursively compile all Nim extension modules and libraries:
$ nimporter compile
Finally, the CLI has provisions for listing out the extensions that it can
auto-detect. This is useful to identify if an extension folder structure is
properly setup.
# List all extensions that Nimporter will find when handling imports
$ nimporter list
⚓ Usage with Docker
Nimporter can easily be used within a Docker container. To prevent the need for
a Nim compiler toolchain to be installed into the container to run Nim code,
the extensions can be precompiled and copied into the container. This process
is roughly as follows:
Create a project that uses Python and Nim
Run nimporter compile to recursively-compile all extensions in the project
Ensure that in your Dockerfile that the __pycache__ directories are
included as they will contain the Nim shared objects as well as the
Nimporter hash files to prevent a recompilation (which would fail without a
Nim & C compiler installed in the container).
🧪 Running The Tests
To run Nimporter’s test suite on your local machine, you will need to install a
Nim compiler. This example will assume you are cloning the GitHub repository.
$ git clone https://github.com/Pebaz/Nimporter
$ cd Nimporter
$ pip install -r requirements_dev.txt
$ pip install .# Nimporter is needed for the integration tests
$ pytest --cov=. --cov-report=html tests
❓ How Does Nimporter Work?
Nimporter provides essentially two capabilities:
The ability to directly import Nim code
The ability to bundle Python-compatible extensions for any supported platform
The way it accomplishes the ability to import Nim code is by adding two custom
importers to the Python import machinery. This is why it is required to import
Nimporter before importing any Nim code because the Python import machinery
must be amended with the custom importers.
The first one is for the ability to search and import Nim modules. When a Nim
module is found, Nimporter first looks in the __pycache__ directory to see if
there is already a built version of the module. If there is not, it builds a
new one and stores it in the __pycache__ directory.
If one is found, it could be stale, meaning the Nim file could have been
modified since it was built. To keep track of this, a hash of the source file
is also kept in the __pycache__ directory and is consulted whenever there is
a possibility that a stale build could be imported.
When a Nim module and a Python module have the same name and reside in the same
folder, the Python module is given precedence. Please don’t do this.
The second custom importer has the exact same purpose of the first one except
it is used to import Nim extension libraries. A library is any folder within a
Python project that contains a <lib name>.nim, a <lib name>.nimble, and a
<lib name>.nim.cfg.
These files mark that the folder should be treated as one unit. It also makes
it so that Nimble dependencies can be installed.
As for the second capability, Nimporter helps you bundle and distribute Nim
code as part of a source or binary distribution extremely easily.
The way it works is by iterating through your entire project and identifying
any Nim module and Nim library that it finds and compiling them to C using a
feature of Nim that specifically supports this.
Why compile to C? Because Python already has extensive infrastructure to
support the compilation and distribution of C extensions.
Once each Nim module and library is compiled to C, Python deals with them the
exact same way as a typical C extension. These extensions are then bundled into
the resulting binary distribution and can be uploaded to PyPi or similar.
For source distributions, Nimporter instructs the Nim compiler to output a copy
of the generated C code for each platform, architecture, and C compiler that is
supported by the library author (some libraries only make sense to work on
Windows for example like DirectX). It then bundles all of these as individual C
extensions into the source distribution. At installation time, Nimporter then
selects the C extension that matches the end-user’s host machine target triple.
👷 Contributing
Pull requests are welcome,
especially for fixing bugs! 😁
Feel free to open an issue if
something seems to be broken but please look through the README first if time
allows.
👏 Special Thanks
Nimporter would not be possible without
Nimpy. Thank you
Yuriy Glukhov for making this project possible!
Crft.co is a hypothetical blogging platform and content management system created for my NYCDA WDF course. We were tasked with building out a simple CRUD application using ActiveRecord to manage a Postgres Database and Ruby with Sinatra on the backend.
Build Status
Currently I have implemented a simple structure that is mostly mobile responsive, but not entirely. The page supports tags and searching tags, however most work needs to be done to smooth out some edgecases on tags(specifically returning the proper error page on failure). I would also like to include comments, private messaging, and a public forum/channel. I am working on integrating Bcrypt for secure authentication, WillPaginate to manage pagination, and Carrierwave for accomodating image file upload.
Code Style
There are some redundancies in the erb files that I would like to sand down, however I feel that much of the rendering is done dynamicaly, although I hope to make this process more lean and DRY. I did not write any JavaScript and kept my client side activity to a minimum. Moving forward I would like to change that. My main focus was on effective pathway control and database manipulation with Ruby, Sinatra, and ActiveRecord.
Technology Used
To style the page I am using Bootstrap, Google Fonts, and images from Pexels. On the back end I implemented Ruby with Sinatra to run my server, and ActiveRecord to manage my Postgres database.
Features
This project features user generated profiles, text-based posts, and tags. All of the basic CRUD functions are working, and tag search is in beta.
Code Example
Below is an example of the Ruby route patterns used to control user flow and content management.
Permission is hereby granted, free of charge, to any person obtaining a copy
of this software and associated documentation files (the “Software”), to deal
in the Software without restriction, including without limitation the rights
to use, copy, modify, merge, publish, distribute, sublicense, and/or sell
copies of the Software, and to permit persons to whom the Software is
furnished to do so, subject to the following conditions:
The above copyright notice and this permission notice shall be included in all
copies or substantial portions of the Software.
THE SOFTWARE IS PROVIDED “AS IS”, WITHOUT WARRANTY OF ANY KIND, EXPRESS OR
IMPLIED, INCLUDING BUT NOT LIMITED TO THE WARRANTIES OF MERCHANTABILITY,
FITNESS FOR A PARTICULAR PURPOSE AND NONINFRINGEMENT. IN NO EVENT SHALL THE
AUTHORS OR COPYRIGHT HOLDERS BE LIABLE FOR ANY CLAIM, DAMAGES OR OTHER
LIABILITY, WHETHER IN AN ACTION OF CONTRACT, TORT OR OTHERWISE, ARISING FROM,
OUT OF OR IN CONNECTION WITH THE SOFTWARE OR THE USE OR OTHER DEALINGS IN THE
SOFTWARE.
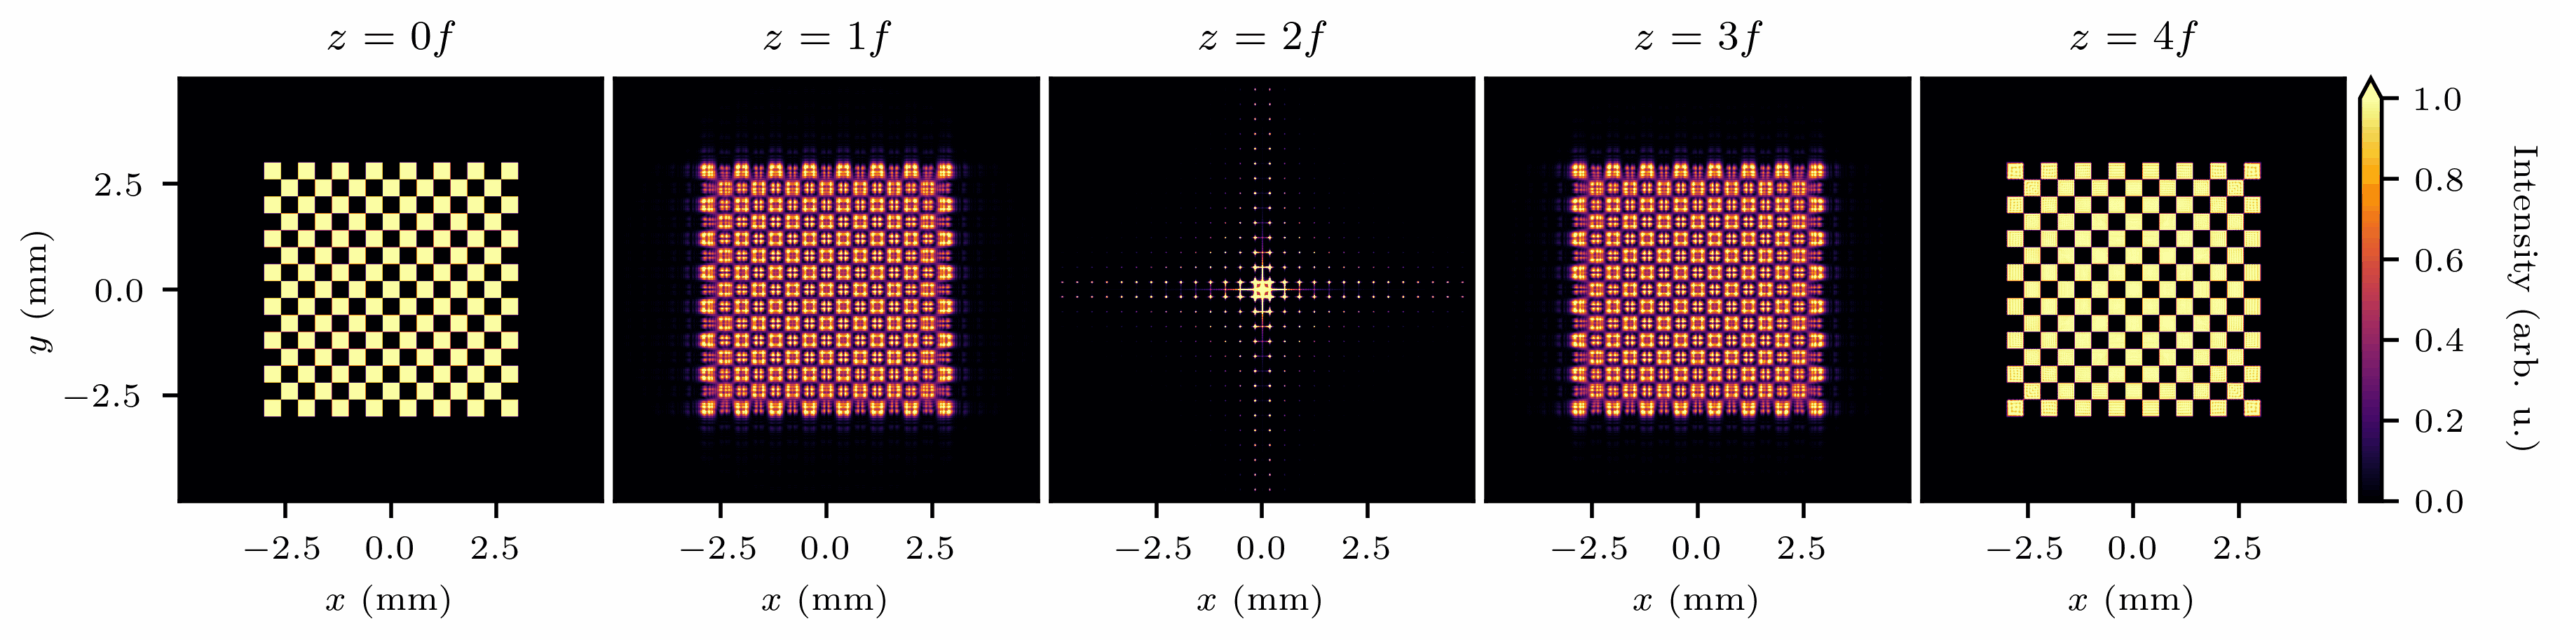
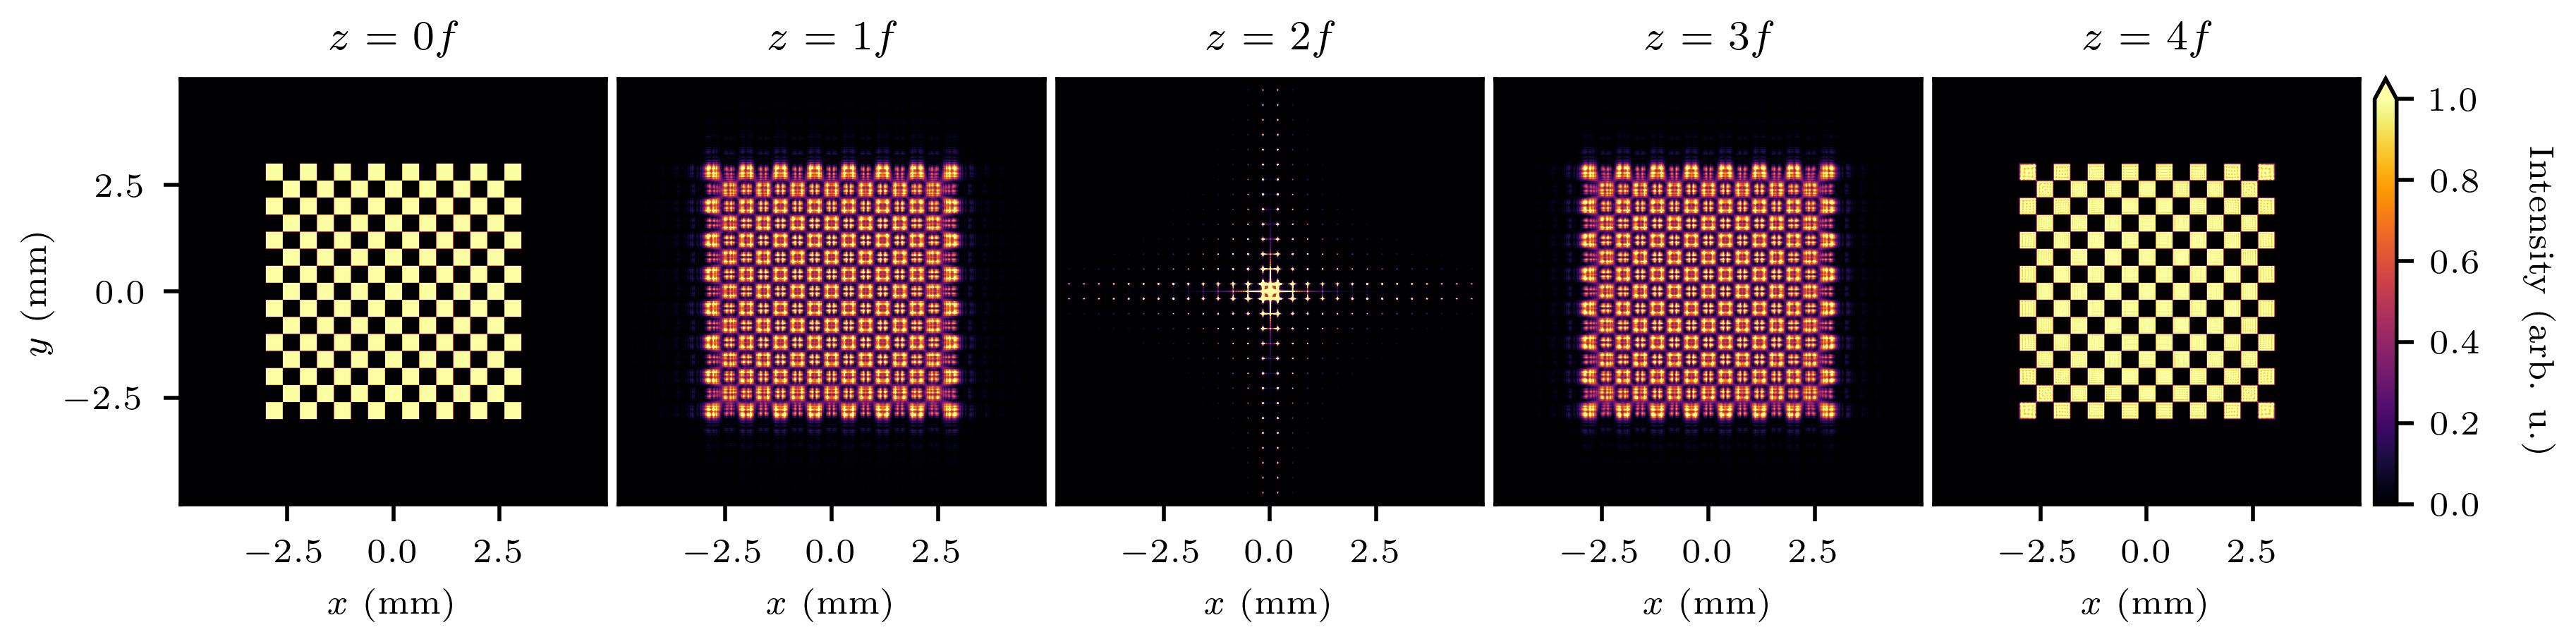
This example shows how to simulate a 4f imaging system using TorchOptics, computing and visualizing the field at each focal plane along the optical axis:
importtorchimporttorchopticsfromtorchopticsimportField, Systemfromtorchoptics.elementsimportLensfromtorchoptics.profilesimportcheckerboard# Set simulation propertiesshape=1000# Number of grid points in each dimensionspacing=10e-6# Spacing between grid points (m)wavelength=700e-9# Field wavelength (m)focal_length=200e-3# Lens focal length (m)tile_length=400e-6# Checkerboard tile length (m)num_tiles=15# Number of tiles in each dimension# Determine devicedevice="cuda"iftorch.cuda.is_available() else"cpu"# Configure default propertiestorchoptics.set_default_spacing(spacing)
torchoptics.set_default_wavelength(wavelength)
# Initialize input field with checkerboard patternfield_data=checkerboard(shape, tile_length, num_tiles)
input_field=Field(field_data).to(device)
# Define 4f optical system with two lensessystem=System(
Lens(shape, focal_length, z=1*focal_length),
Lens(shape, focal_length, z=3*focal_length),
).to(device)
# Measure field at focal planes along the z-axismeasurements= [
system.measure_at_z(input_field, z=i*focal_length)
foriinrange(5)
]
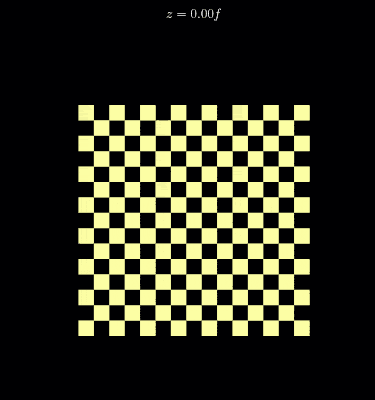
# Visualize the measured intensity distributionsfori, measurementinenumerate(measurements):
measurement.visualize(title=f"z={i}f", vmax=1)
Intensity distributions at different focal planes in the 4f system.
Propagation of the intensity distribution.
For more examples and detailed usage, please refer to the documentation.
If you use TorchOptics in your research, please cite our paper:
@misc{filipovich2024torchoptics,
      title={TorchOptics: An open-source Python library for differentiable Fourier optics simulations},
      author={Matthew J. Filipovich and A. I. Lvovsky},
      year={2024},
      eprint={2411.18591},
      archivePrefix={arXiv},
      primaryClass={physics.optics},
      url={https://arxiv.org/abs/2411.18591},
}
License
TorchOptics is distributed under the MIT License. See the LICENSE file for more details.
This example shows how to simulate a 4f imaging system using TorchOptics, computing and visualizing the field at each focal plane along the optical axis:
importtorchimporttorchopticsfromtorchopticsimportField, Systemfromtorchoptics.elementsimportLensfromtorchoptics.profilesimportcheckerboard# Set simulation propertiesshape=1000# Number of grid points in each dimensionspacing=10e-6# Spacing between grid points (m)wavelength=700e-9# Field wavelength (m)focal_length=200e-3# Lens focal length (m)tile_length=400e-6# Checkerboard tile length (m)num_tiles=15# Number of tiles in each dimension# Determine devicedevice="cuda"iftorch.cuda.is_available() else"cpu"# Configure default propertiestorchoptics.set_default_spacing(spacing)
torchoptics.set_default_wavelength(wavelength)
# Initialize input field with checkerboard patternfield_data=checkerboard(shape, tile_length, num_tiles)
input_field=Field(field_data).to(device)
# Define 4f optical system with two lensessystem=System(
Lens(shape, focal_length, z=1*focal_length),
Lens(shape, focal_length, z=3*focal_length),
).to(device)
# Measure field at focal planes along the z-axismeasurements= [
system.measure_at_z(input_field, z=i*focal_length)
foriinrange(5)
]
# Visualize the measured intensity distributionsfori, measurementinenumerate(measurements):
measurement.visualize(title=f"z={i}f", vmax=1)
Intensity distributions at different focal planes in the 4f system.
Propagation of the intensity distribution.
For more examples and detailed usage, please refer to the documentation.
If you use TorchOptics in your research, please cite our paper:
@misc{filipovich2024torchoptics,
      title={TorchOptics: An open-source Python library for differentiable Fourier optics simulations},
      author={Matthew J. Filipovich and A. I. Lvovsky},
      year={2024},
      eprint={2411.18591},
      archivePrefix={arXiv},
      primaryClass={physics.optics},
      url={https://arxiv.org/abs/2411.18591},
}
License
TorchOptics is distributed under the MIT License. See the LICENSE file for more details.
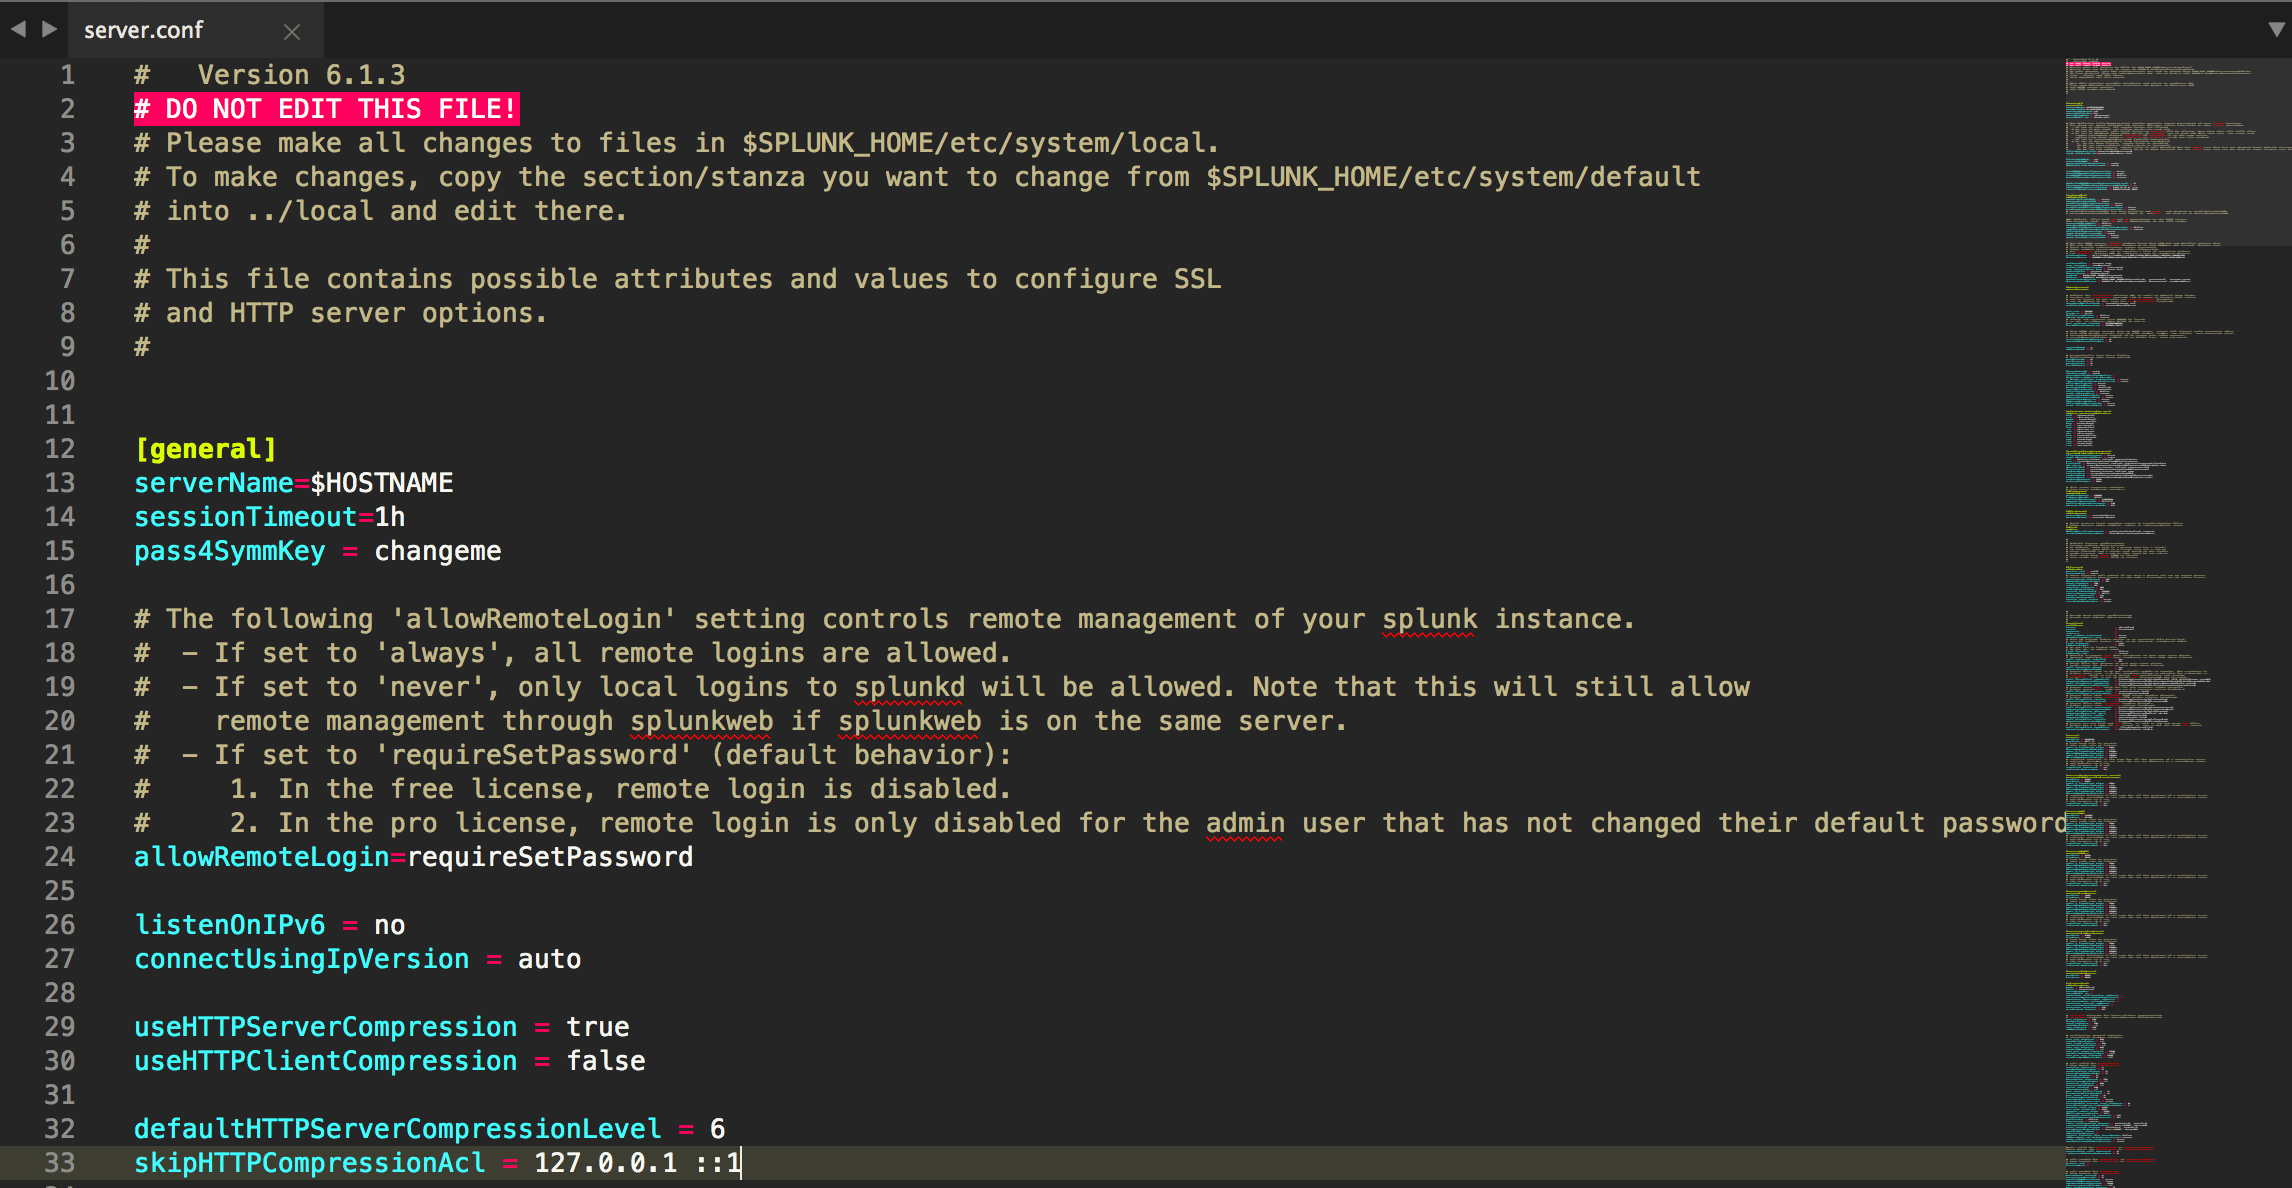
Patterns are used to identify some part of a file.
Patterns used by this package:
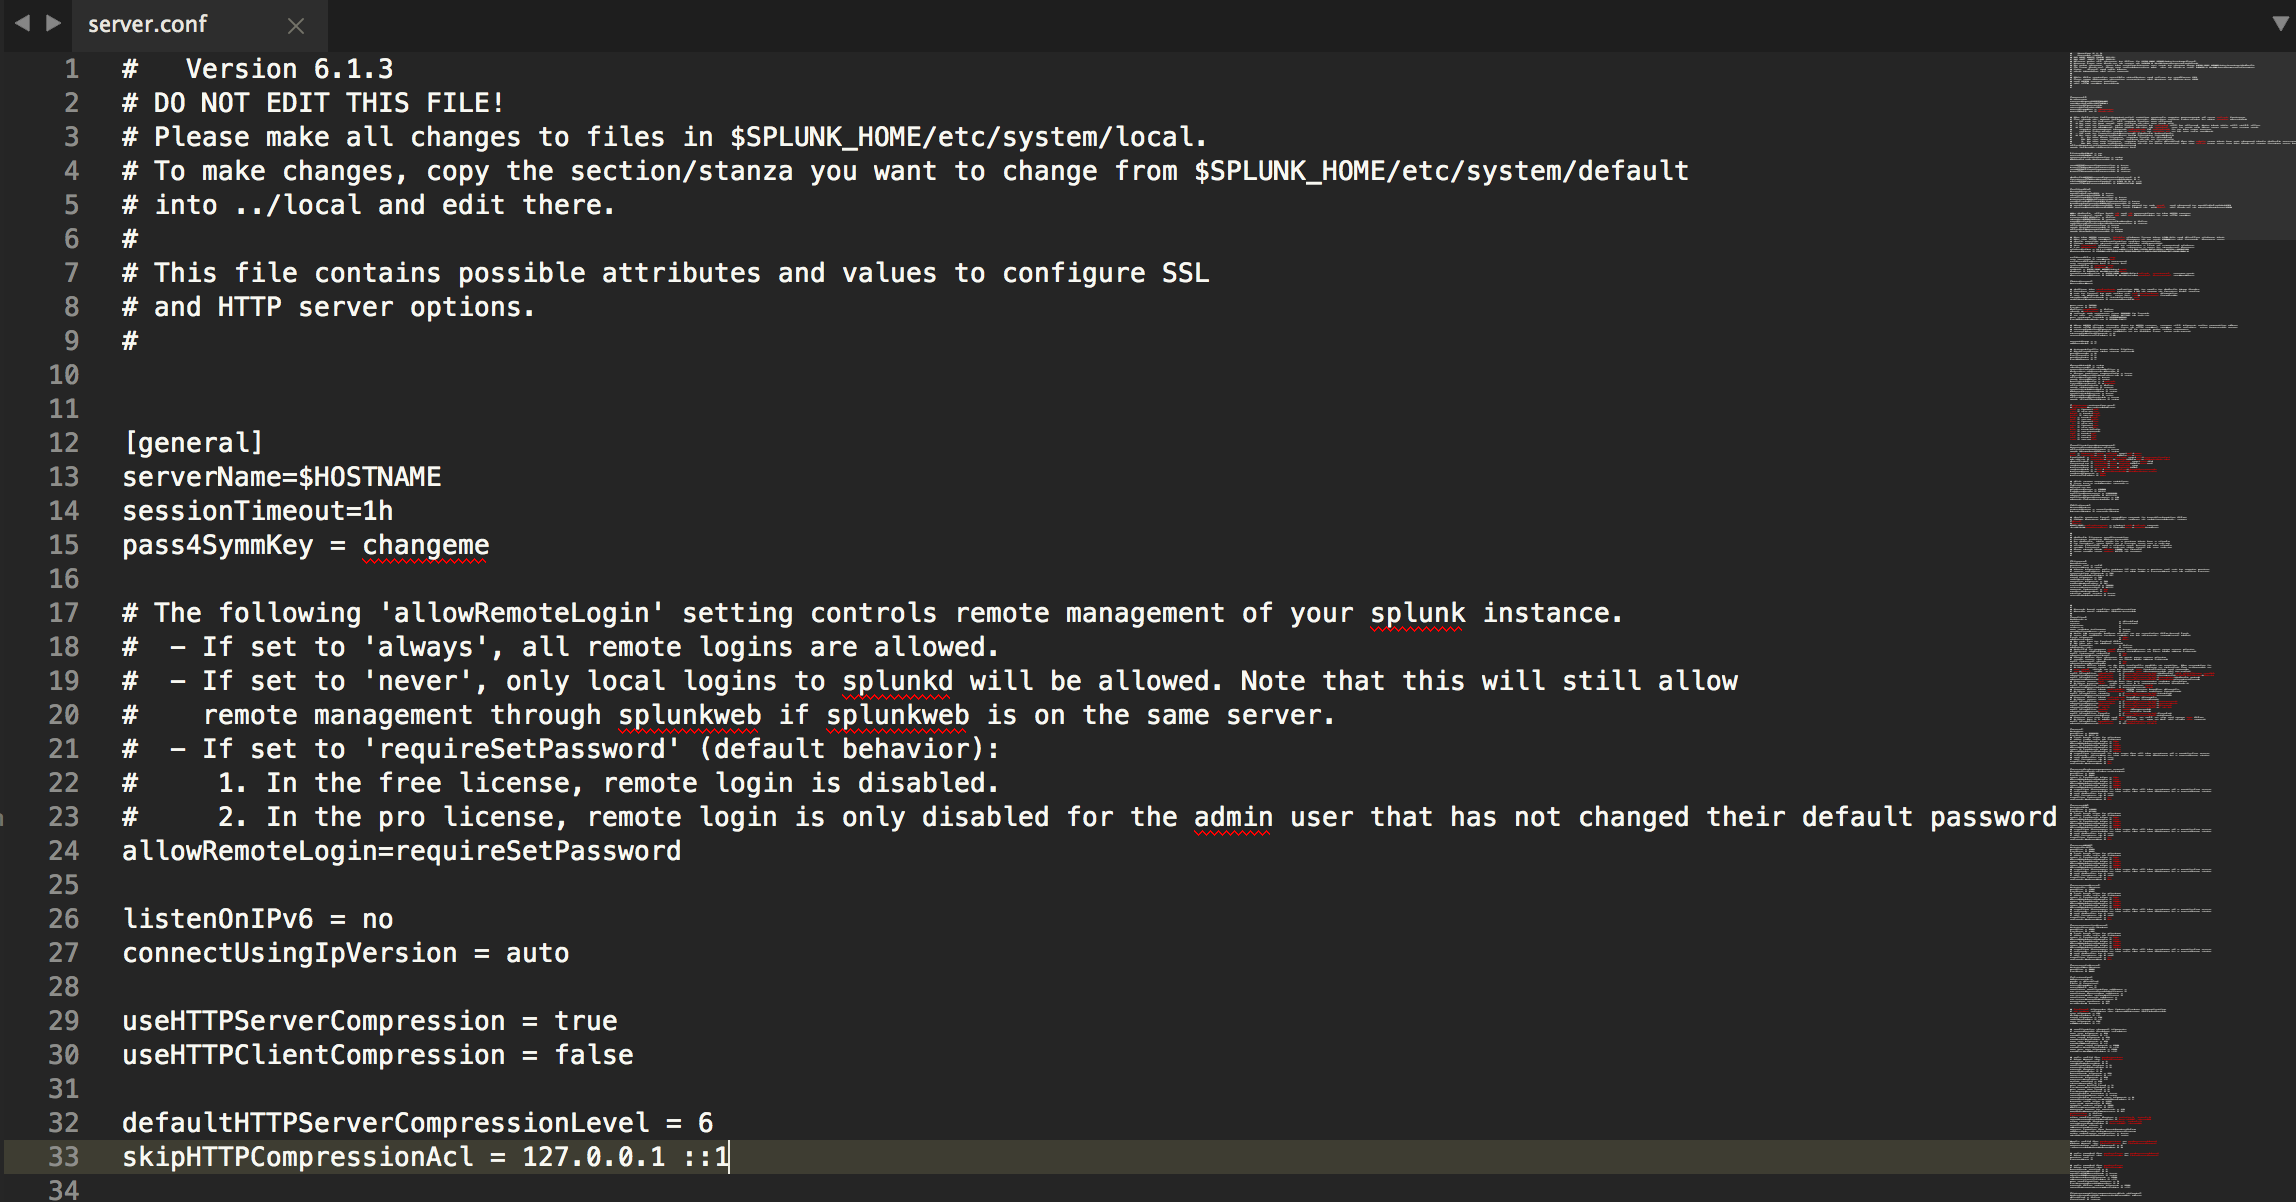
^# DO NOT EDIT THIS FILE\\!$ – marks any lines as invalid if they are # DO NOT EDIT THIS FILE!
^#.*$ – marks any lines that start with # as a comment
^\\[.*\\]$ – marks any line starting with [ and ending with ] as a stanza
^[\\w+\\.\\-\\:]+ – marks the beginning of a line as a conf key; defined by any whitespace, alphanumeric, - or : characters
= – marks any = as an equals sign
Patterns have 3 main attributes:
match (or, begin and end): regex patterns
name: a TextMate language grammar group, comment.line for an inline comment
comment: a comment about the pattern
Resources
This TextMate Language Grammars guide is really helpful for figuring out what name to use for each rule.
Development Notes
There are 2 important files here:
splunk-conf.YAML-tmLanguage – The AAAPackageDev package compiles this to the following, this YAML file is much easier to use
splunk-conf.tmLanguage – This is a TextMate language definition file in XML format. SublimeText uses this format, it’s a necessary evil.
Install package control if you haven’t already
cmd + shift + P (Mac) or ctrl + shift + P (Windows)
Install package
AAAPackageDev
Open splunk-conf.YAML-tmLanguage
cmd + B should update splunk-conf.tmLanguage, make a small change and see if it worked. If not, play with your build system settings under Tools -> Build System
During development you’ll need to constantly copy the splunk-conf.tmLanguage into your Sublime Text package folder, like so: cp splunk-conf.tmLanguage ~/Library/Application\ Support/Sublime\ Text\ 3/Packages/user/splunk-conf.tmLanguage
If something doesn’t seem to update, quit & reopen Sublime Text and it should work.


 https://github.com/maskentir/qontalk